Introduction
Serverless computing is a cloud computing execution model where the cloud provider assigns machine resources on demand and manages the servers on behalf of their customers. In a serverless architecture, developers don’t need to worry about capacity planning, configuration, management, maintenance, fault tolerance, or container scaling. They can solely focus on writing application code and speed up their time-to-market. The purpose of this proof-of-concept is to delve deeper into one of the most important AWS Serverless technologies, demonstrate their advantages over traditional approaches, and evaluate the complexity of such an architecture.
Our objective was to develop a lean booking system that allows employees to book their working time on specific projects. We have implemented the following features:
- Create new Account
- Login into Account
- Create new Booking
- Update existing Booking
- Delete Booking
The following AWS serverless technologies and services were used for the implementation:

Infrastructre as Code with AWS CDK
The AWS Cloud Developement Kit is a set of libraries that can be used to define AWS infrastructure in code. CDK is available inside several programming languages, in our case Java was used. CDK uses AWS Cloud Formation underneath: The configuration written in Java is compiled into a Cloud Formation Template, which is then uploaded to AWS and executed by Cloud Formation. This is all automated by the CDK CLI.
The Domain Specific Language (DSL) from CDK provides us with Java-Classes that represent instances and invocations of AWS Services. We can construct these service entities inside AWS by constructing Java-Objects of the representing classes. For example, we can create a DynamoDB table and configure it by building an object of class DynamoDB:
Table table = Table.Builder.create(this, "poc-serverless-db-" + stageName)
        .partitionKey(Attribute.builder().name("userId").type(AttributeType.STRING).build())
        .sortKey(Attribute.builder().name("bookingId").type(AttributeType.STRING).build())
        .tableName(BOOKING_TABLE_NAME + "-" + stageName)
        .removalPolicy(RemovalPolicy.DESTROY) // Needed to later be able to delete DB per cdk destroy
        .encryption(TableEncryption.AWS_MANAGED)
        .build();
public class CdkPipeline extends Stack {
    public CdkPipeline(final Construct scope, final String id, final StackProps props) {
        super(scope, id, props);
        ...
    }
    ...
}
public class CdkApp {

    public static void main(final String[] args) {
        App app = new App();

        new CdkPipeline(app, "PipelineApiGatewayFrontendStack", StackProps.builder()
                .env(Environment.builder()
                        .account(Configuration.ACCOUNT)
                        .region(Configuration.REGION)
                        .build())
                .build());
        app.synth();
    }
}
The stack forms a hierarchical structure, controlled by the associations in the CDK Java-Code:
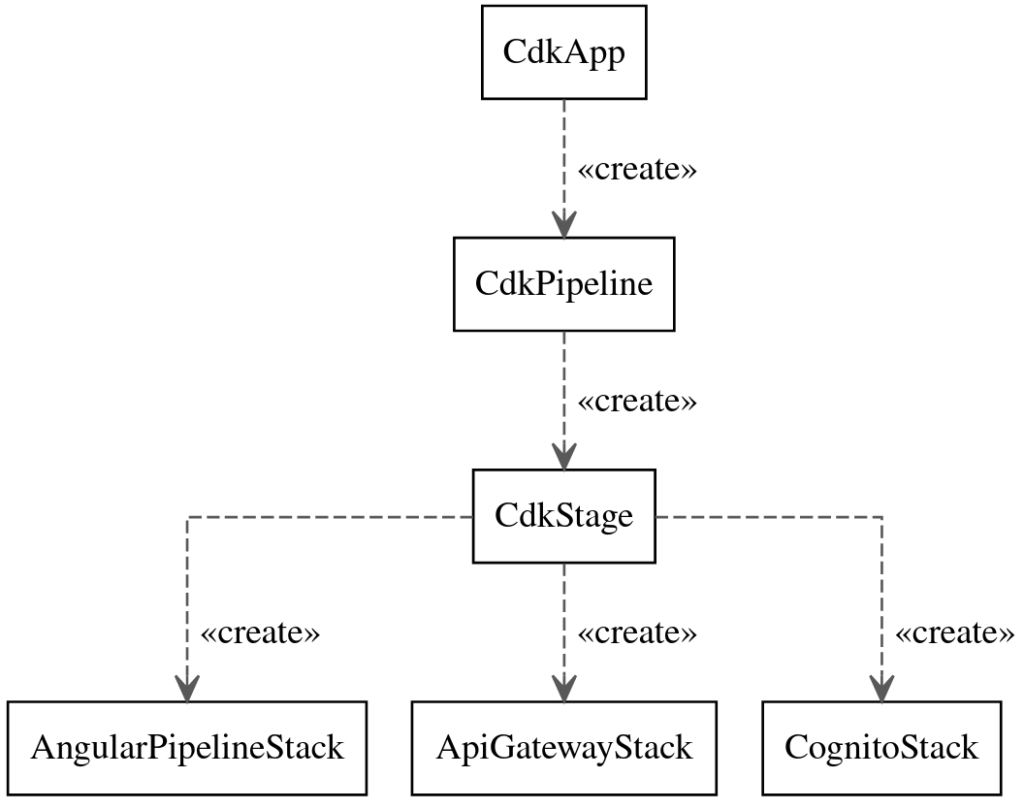
AngularPipelineStack, ApiGatewayStack and CognitoStack are CloudFormation Stacks themselves.
Implementation Details
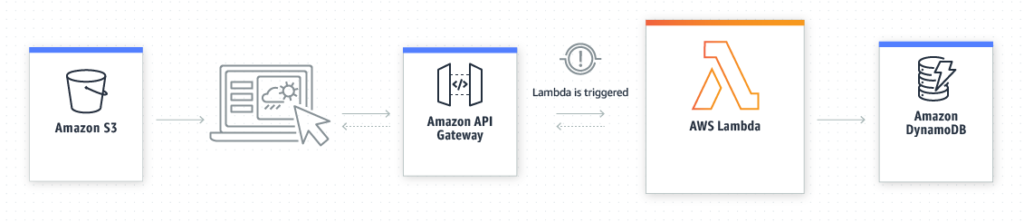
DynamoDB
DynamoDB is the serverless No-SQL-Database offered by AWS. It is record based, each entry can have a variable amount of properties. Whereas SQL databases require a primary key, DynamoDB uses only a partition key and an optional sort key if the partition key itself is not unique. Since DynamoDB is so called serverless and elastic, you don’t have to worry about either maintenance or scaling.
DynamoDB tables are redundantly hosted by default, as they are replicated across multiple availability zones within an AWS Region. Two types of indexes are available: The global secondary index and the local secondary index. The former can be used to synchronize tables over multiple regions. An index has to use the same partition key as the table it references but it can provide a different sort key. Additionally DynamoDB supports PartiQL, a pseudo-SQL dialect supported by AWS for a lot of data services. However inside DynamoDB only a subset of PartiQL is supported, for example Joins over multiple tables can not be used.
We used two tables with identical properties, one for every stage (bookings-emea-test, bookings-emea-int), to store our booking items. The userId was chosen as partition key and bookingId as sort key. Additionally we set up a local secondary index, date-index, to retrieve chronological bookings for a given user. All other attributes from our table were mapped into the index.
The DynamoDB operations used were:
- PutItem
- DeleteItem
- Query (The Query-Operation was used since we wanted to fetch multiple entries at a time, for our view)
It can be argued wether DynamoDB is the ideal solution for an application, where a lot of usecases deal with relations between types of entities. For example, you would have to connect projects and their bookings, to generate project reports. This is be needed if your want to determine how much labour cost each project has accumulated. In such a case a lot of developers would choose a SQL-Database, but it is worth to look at the specific usecase. Most simple relations can be modeled well enough by DynamoDB. Many to one relationships, for example, can be modeled via composite keys. For some examples on relational modeling in DynamoDB, see: https://docs.aws.amazon.com/amazondynamodb/latest/developerguide/bp-modeling-nosql-B.html. This approach has the advantage, that it is much faster, than querying a relational database, since it uses only one DynamoDB table.
DynamoDB via SDK
DynamoDB deployment in CDK, as already seen in the above example of CDK code:
Table table = Table.Builder.create(this, "poc-serverless-db-" + stageName)
        .partitionKey(Attribute.builder().name("userId").type(AttributeType.STRING).build())
        .sortKey(Attribute.builder().name("bookingId").type(AttributeType.STRING).build())
        .tableName(BOOKING_TABLE_NAME + "-" + stageName)
        .removalPolicy(RemovalPolicy.DESTROY) // Needed to later be able to delete DB per cdk destroy
        .encryption(TableEncryption.AWS_MANAGED)
        .build();
The local index is also added:
table.addLocalSecondaryIndex(LocalSecondaryIndexProps.builder()
        .indexName("date-index")
        .sortKey(Attribute.builder().name("date").type(AttributeType.STRING).build())
        .build());
Lambda
To create, read, update and delete data from our DynamoDB, we implemented three Lambda functions to handle put, get and delete requests. Those Lambda functions can be called by the API-Gateway.
Lambda functions are serverless functions. We need only to supply the class of our handler and AWS will take care of bringing the function online. They run concurrently in a single process if our Lambda is invoked multiple times and share process-wide states like static fields in Java.
To initialize our project, we call in an empty folder "cdk init app --language java". Because we want to keep our Lambda code in the same repository as our pipeline code, we create two subfolders: software and infrastructure. We delete the provided pom.xml, source and target folder as they contain examples we don’t need. We start with our software folder which will contain our three Lambda functions. We initialize a maven project in this module.
Lambda functions
The Json received by our function is automatically converted into a Map<String, String> by Lambda and passed to our handler. We want to convert this input into a DynamoDB request. So first we need to initialize our database client. The stage of our DynamoDB is saved in an environment variable which we set in CDK(more on this later). The environment variable AWS_REGION is automatically supplied by AWS . Note that our client is package private for testing reasons.
static Table bookings;
private final String DYNAMODB_TABLE_NAME = "bookings";
private final String REGION_ENV_VAR = "AWS_REGION";
private final String STAGE_NAME_VAR = "STAGE_NAME";
...
@Override
public Object handleRequest(Map<String, String> query, Context context) {
    String stageName = System.getenv(STAGE_NAME_VAR);
    ...
    if (bookings == null) {
        AmazonDynamoDB amazonDynamoDB = AmazonDynamoDBClientBuilder.standard().withRegion(
                System.getenv(REGION_ENV_VAR)).build();
        final DynamoDB db = new DynamoDB(amazonDynamoDB);
        this.bookings = db.getTable(DYNAMODB_TABLE_NAME + "-" + stageName);
    }
    ...
}
With this client, we can compose and execute our query and return the result as Json:
...
static Table bookings;
private final String PRIMARY_KEY = "userId";
...

@Override
public Object handleRequest(Map<String, String> query, Context context) {
...
    final QuerySpec spec = new QuerySpec().withKeyConditionExpression(PRIMARY_KEY + " = :v_userId")
            .withValueMap(new ValueMap().withString(":v_userId", query.get(PRIMARY_KEY)));

    final ItemCollection<QueryOutcome> items = bookings.query(spec);

    final LinkedList<Object> retObjects = new LinkedList<>();
    items.forEach(item -> retObjects.add(item.asMap()));
    logger.log("Return result: " + retObjects);
    return retObjects;
}
Lambda CDK Setup
We use Lambda CDK to set up our AWS CodePipeline to which we add two Lambda stages; one for emea-test and one for emea-int. We keep close to the guide provided by AWS beginning from „Define a pipeline“. We put the code of our pipeline in our infrastructure subfolder.
We define our pipeline stack as follows:
public LambdaPipelineViaCdkStack(final Construct scope, final String id, final StackProps props) {
    super(scope, id, props);

    Repository repository = Repository.Builder.create(this, "LambdaRepository")
            .repositoryName("zettl-serverless-backend") // set repositoryName to your liking
            .build();
    CodePipeline pipeline =
            CodePipeline.Builder.create(this, "pipeline").pipelineName("Zettl_Lambdas") // set pipelineName to your liking
                    .synth(ShellStep.Builder.create("Synth")
                            .input(CodePipelineSource.codeCommit(repository, "master"))
                            .commands(Arrays.asList("npm install -g aws-cdk", "cdk synth")).build())
                    .dockerEnabledForSynth(
                            true) // If you add this to an already existing pipeline, read docu of method
                    .build();

    pipeline.addStage(new LambdaStage(this, "DeployBookingLambdasTest", "emea-test",
            StageProps.builder().env(Environment.builder().account("<enterYourAccountId>").region(this.getRegion()).build())
                    .build()));
}
As you can see, we create using the pipeline where we push our code to. We need to keep this in mind because as our CodeCommit repository is part of the pipeline, a deletion of the pipeline stack also deletes our repository and thus our code. The definition of our Lambda Stage is concise. Because we need a stage-dependant database for our Lambda, we call the DynamoDBStack as well. See our chapter on database.
public LambdaStage(final Construct scope, final String id, final String stageName, final StageProps props) {
    super(scope, id, props);

    Stack lambdaStack = new LambdaStack(this, "LambdaStack", stageName);
    DynamoDBStack dynamoDBStack = new DynamoDBStack(this, "DynamoDBStack", stageName);
}
The definition of our Lambda stack is a bit more tricky. Because we need to provide the compiled class files in case of Java code bundled with its dependencies, we need to first compile our sources in an environment that has a Java compiler installed. Fortunately, there is a guide by AWS that explains how to set up a docker container to compile and bundle the resources. It is important to note that dockerEnabledForSynth needs to be enabled in our pipeline stack or else creating a docker will fail. To bundle our code, we use the maven shade plugin.
public LambdaStack(final Construct scope, final String id, final String stageName, final StackProps props) {
    super(scope, id, props);

    // We package code in a docker container. Code from 'Code.fromAsset' is put into folder /asset-input/ inside the
    // docker container during step of CodeBuild. The output of CodeBuild is expected in the folder asset-output and put into S3.
    List<String> handlerPackagingInstructions = Arrays.asList("/bin/sh", "-c",
            "mvn package shade:shade && cp /asset-input/target/Lambdas.jar /asset-output/");

    BundlingOptions.Builder builderOptions = BundlingOptions.builder().command(handlerPackagingInstructions)
            .image(Runtime.JAVA_11.getBundlingImage()).volumes(singletonList(
                    // Mount local .m2 repo to avoid download all the dependencies again inside the container
                    DockerVolume.builder().hostPath(System.getProperty("user.home") + "/.m2/")
                            .containerPath("/root/.m2/").build())).user("root")
            // Output is a jar. This is how we tell this to our pipeline.
            .outputType(ARCHIVED);

    // Code.fromAsset path is from project root
    final AssetCode code =
            Code.fromAsset("./software/", AssetOptions.builder().bundling(builderOptions.build()).build());
...
As our Lambdas require rights to access our DynamoDB, we create a method to define our roles and policies:
private Role createExecutionRoleForTableResource(final String name, final List<String> actions, final String stageName) {

    final List<String> resources = List.of(
            "arn:aws:dynamodb:" + this.getRegion() + ":<AccountNumber>:table/" + BOOKING_TABLE_NAME + "-" + stageName);
    PolicyStatement policyStatement = new PolicyStatement(PolicyStatementProps.builder()
            .actions(actions)
            .resources(resources)
            .build());
    PolicyDocument policyDoc = new PolicyDocument(PolicyDocumentProps.builder()
            .statements(List.of(policyStatement))
            .build());
    ManagedPolicy policy = new ManagedPolicy(this, name + "Policy_" + stageName + "_" + this.getRegion(), ManagedPolicyProps.builder()
            .description("Policy for " + name + " on " + stageName + " in " + this.getRegion() + ".")
            .document(policyDoc)
            .build());
    ServicePrincipal principalLambda = new ServicePrincipal("lambda.amazonaws.com",
            ServicePrincipalOpts.builder().region(this.getRegion()).build());
    return new Role(this, name + "ExecutionRole_" + stageName + "_" + this.getRegion(), RoleProps.builder()
            .roleName(name + "ExecutionRol_" + stageName + "_" + this.getRegion())
            .assumedBy(principalLambda)
            .managedPolicies(List.of(policy))
            .build());
}
We then let this method create our roles for each Lambda:
final String deleteBookingFunctionName = "DeleteBooking-" + stageName;
final String getBookingFunctionName = "GetBooking-" + stageName;
final String putBookingFunctionName = "PutBooking-" + stageName;

Role deleteBookingExecutionRole = createExecutionRoleForTableResource("deleteBooking",
        List.of("dynamodb:DeleteItem", "logs:CreateLogGroup", "logs:CreateLogStream"), stageName,
        deleteBookingFunctionName);
Role getBookingExecutionRole = createExecutionRoleForTableResource("getBooking",
        List.of("dynamodb:Query", "logs:CreateLogGroup", "logs:CreateLogStream"), stageName,
        getBookingFunctionName);
Role putBookingExecutionRole = createExecutionRoleForTableResource("putBooking",
        List.of("dynamodb:PutItem", "dynamodb:UpdateItem", "logs:CreateLogGroup", "logs:CreateLogStream"),
        stageName, putBookingFunctionName);
Now we have everything we need to define our Lambda function. We use a high memory size of 1024MB because AWS allocates CPU power in proportion to the amount of memory configured.
final Map<String, String> envVars = Map.of(STAGE_NAME_VAR, stageName);

    final Function getFunction = new Function(this, "GetBookingHandler-" + stageName,
            FunctionProps.builder().code(code).handler("lambda.GetBookingHandler").memorySize(1024)
                    .runtime(Runtime.JAVA_11).role(getBookingExecutionRole).functionName(getBookingFunctionName)
                    .timeout(Duration.millis(60000)).environment(envVars).build());
    ...
}
Lastly, we need to define the exec-maven-plugin in our pom.xml for the infrastructure which points to the main class of our pipeline app:
<plugin>
    <groupId>org.codehaus.mojo</groupId>
    <artifactId>exec-maven-plugin</artifactId>
    <version>3.0.0</version>
    <configuration>
        <mainClass>de.consol.LambdaPipelineViaCdkApp</mainClass>
    </configuration>
</plugin>
We use the CDK to synth and deploy our Lambda. For the CDK to know what to do, we need to point our cdk.json to the right pom.xml. So we change the app line to:
"app": "mvn -f ./infrastructure/pom.xml -e -q compile exec:java",
We now execute cdk deploy from our main folder. CDK now creates roles in IAM, an S3 Bucket for our pipeline, a CodeCommit repository, a CodePipeline, a stack in CloudFormation for our pipeline and a Cloudwatch Event Rule that triggers our pipeline as soon as our repository has an update. The pipeline is immediately triggered but will fail because there is no code in the repository yet. We need to push our code to the repository first using git. To find out what upstream to use, we checked in the AWS console. After we pushed, the pipeline creates our three Lambdas.
Lambda Optimization
When a Lambda is not used for some minutes, it will go cold and take longer on our next invocation. For our simple Java Lambda, this cold start took several seconds. AWS is aware of this problem and introduced SnapStart. Unfortunately, after enabling and versioning our Lambda, the cold start time improved by only 1-2 seconds, but the invocation time was still above 5 seconds.
To avoid the Lambda going cold, we created a rule in Amazon EventBridge that pings our Lambda every 2 minutes. As the cost of Lambdas is dependant on the actual run time and an invocation of our warm Lambda takes below 15ms, pinging several hundred times is still cheaper than one cold start.
API-Gateway
The feature set of API Gateway is quite powerful. Firstly, it replaces the need for a load balancer that would traditionally require configuration and payment. With API Gateway, you can define your resources and data model, and it generates Swagger or OpenAPI files for you out of the box. Additionally, you can generate language-specific client code to easily integrate the HTTP/REST endpoint into your microservice.
Furthermore, API Gateway can validate your requests, reducing the implementation effort required on the Lambda side. You can also define API keys and assign them to usage plans, allowing you to track which client is using your API and restricting the number of concurrent or total requests per month that can be sent to the gateway. This helps to avoid a single client overloading the service and limits the maximum costs that can occur. Another useful feature is the ability to cache static content for up to 24 hours, which can help reduce backend traffic.
Lastly, API Gateway has native Cognito and Lambda integration, making it easy to build an AWS-integrated use case with it. Here’s an example operation written with the Java CDK:
private void addGetMethod(Resource resource, Model responseModel) {
    IFunction lambda = Function.fromFunctionName(this, "getLambda", config.getGetLambdaName());
    LambdaIntegration lambdaIntegration = LambdaIntegration.Builder.create(lambda )
            .proxy(false)
            .allowTestInvoke(true)
            .requestTemplates(Map.of(JSON, new JSONObject(Map.of("userId", "$input.params('userId')")).toString()))
            .integrationResponses(List.of(IntegrationResponse.builder()
                    .statusCode(httpOk)
                    .responseParameters(corsHeaders)
                    .build()))
            .build();
    resource.addMethod("GET", lambdaIntegration, MethodOptions.builder()
            .requestParameters(Map.of("method.request.querystring.userId", true))
            .requestValidatorOptions(RequestValidatorOptions.builder()
                    .requestValidatorName("inputValidator")
                    .validateRequestParameters(true)
                    .build())
            .methodResponses(List.of(MethodResponse.builder()
                    .statusCode(httpOk)
                    .responseParameters(corsResponseHeaders)
                    .responseModels(Map.of(JSON, responseModel))
                    .build()))
            .apiKeyRequired(true)
            .authorizer(auth)
            .authorizationType(AuthorizationType.COGNITO)
            .build());
}
Frontend: Angular hosted in S3
Amazon Simple Storage Service (Amazon S3) is an object storage service that provides exceptional scalability, data availability, security, and performance. Additionally, S3 can be configured to host a static website using Angular or any other framework in a production environment. This is considered a best practice, so we decided to host our Angular frontend in an S3 bucket.
To enable a bucket for website hosting, the following configuration is required:
- Enable „Static website hosting“ in Bucket Poperties
- Make Bucket public: Remove Block all public access from permissions of the Bucket
- Attach bucket Policy (see below)
- Adjust the access control list (ACL) to grant public READ permission on objects in the bucket
This is the Bucket policy:
{
    "Version": "2012-10-17",
    "Statement": [
        {
            "Sid": "PublicReadGetObject",
            "Effect": "Allow",
            "Principal": "*",
            "Action": [
                "s3:GetObject"
            ],
            "Resource": [
                "arn:aws:s3:::Bucket-Name/*"
            ]
        }
    ]
}
Once the Angular build has been copied to the public-accessible S3 bucket, the app should be available under a subdomain of amazonaws.com. This hostname can be found in the bucket properties under the „Static website hosting“ section.
User Authentication: Cognito Integration
Amazon Cognito offers authentication, authorization, and user management for web and mobile applications and can be easily integrated into Angular using the @aws-amplify/ui-angular library. The minimal configuration for this library is as follows:
Amplify.configure({
  Auth: {
    region: '<region>',
    userPoolId: <UserPoolId>,
    userPoolWebClientId: <webClientId>,
    authenticationFlowType: 'USER_PASSWORD_AUTH',
  }
});
After wrapping the <router-outlet> of Angular with the <amplify-authenticator> component, the Angular app becomes accessible only when logged in. Moreover, a production-ready registration and login form is available, enabling users to create accounts with email validation and to log in. Password forget and change workflows are also functional out-of-the-box.
<amplify-authenticator [formFields]="formFields">
  <ng-template amplifySlot="authenticated">
    <router-outlet></router-outlet>
  </ng-template>
</amplify-authenticator>
Of course, a Cognito UserPool with a WebClient for app integration must be created in the AWS console beforehand.
Integration Testing
The API Gateway endpoints undergo integration testing during each deployment. This means that each REST endpoint is called, and the response is verified. For this purpose, we have used the Rest-Assured testing framework. The test suite is executed via Maven during the deploy CodePipeline of the API Gateway.
Code Whisperer
Amazon CodeWhisperer is a Machine Learning powered coding companion. At the time of writing, this companion is still in preview, so it is still free and all you need is an AWS Builder ID. We installed the AWS Toolkit in IntelliJ and in its category „Developer Tools“ we enabled CodeWhisperer.
With CodeWhisperer enabled, pressing ALT+C will show a pop-up menu with multiple code recommendations at the location of your text cursor which we can browse and accept. We tried simply writing comments and let CodeWhisperer write the code as well as letting CodeWhisperer complete started code. Unfortunately, the generated code does not always make sense. Yet, we saved some time because CodeWhisperer knows well which AWS methods to use in which case.
Staging and Rollback
The CDK also provides native support for „stages,“ allowing you to roll out your resources based on stages. Additionally, API Gateway has built-in staging support, while Lambda and S3 use a different concept called versioning.
If you need to perform a rollback, Lambda and S3 allow you to simply use the previous version, without needing to take any action on these resources. For API Gateway, you can activate an older deployment stage.
However, for DynamoDB, there is no staging/versioning concept. Instead, you need to perform a real rollback using Point-in-Time Recovery, which is quite fast compared to a relational database. Keep in mind that DynamoDB does not have a schema, so you usually don’t even need to perform a rollback if you prepare your code to handle additional unknown columns.
Overview of Costs
The serverless stack incurs very low costs for DEV, TEST, and E2E environments. Additionally, for PROD use cases with low throughput, the costs remain relatively low. Moreover, 90% of the implemented solutions cater to the low throughput use case. Furthermore, there is no need to patch and maintain servers, which results in significant cost and effort savings.
In our use case, we did not have fixed costs; instead, we only paid per request. Here is a rough, high-level estimate of what such a setup would cost:
| Service | Unit | Costs |
| API-Gateway | 1 Mio requests | 3.50 $ |
| S3 (Get) | 1 Mio requests | 0.40 $ |
| Cognito | 200 monthly active users | 10 $ |
| Lambda | 1 GB, 20ms per request, 1 Mio requests | 0.53 $ |
| DynamoDB-Storage | 100 GB | 18.69 $ |
| DynamoDB-Write | constant 10 KB/s | 18.69 $ |
| DynamoDB-Read | constant 400 KB/s | 5.47 $ |