Introduction
You want to try apache camel for the first time and get to know some key concepts?
This blog shall help you to get an idea what apache camel is and how to get started to write your own camel code. It will give you an simple example project, which you can use as a starting point.
What exactly is Camel?
Apache camel is a lightweight integration framework. But let’s start with the underlying problem which camel is trying to solve.
The system landscape is getting more and more complex. Monolyths are getting replaced by microservices, which need to talk to each other. But the communication can be hard and tedious. For example there can be many different dataformats (JSON, XML, ZIP), protocolls (JMS, HTTP) and different technologies involved.
This is where camel jumps in and helps you to tackle these problems. So you dont have to focus on how to send a file to FTP-Server, or how get the message to the Message-broker – Let camel handle these low-level „plumbing“ for you.
Let’s get started!
Let’s first start with some basic concepts. I created a simple example project to learn the basic concepts, which you can find here: Example Project
This application will receive a XML-Input-Files, log the input, unmarshall it to a Java-Pojo, do some validations and then marshall it to JSON-Files and send it to other File-Directory.
As you see in the repository, this is an spring-boot application (which will by default enable the CamelContext) and has all the necessary camel dependencies (camel-core, camel-file component (to read and create files), camel-jacksonxml (unmarshall xml to pojo) and camel-jackson (marshall to json). Just can run this spring-application via mvn spring-boot:run and you should see some logging on the console

So let’s get started with the basics. As in the introduction explained, you want to solve the communication between different application. So this integration flow is represented in camel by a „Camel-Route“. To define your own Camel-Route, you need your class to extend to camels „Route-Builder“, which lets camel know that here is the integration flow and be listened to (see picture 2, or FileRoute in example project).

First Route
The „from“-part indicates the start of our camel-route (see picture 2 below) and is the consumer for new messages. Each file in the „inbox“ directory will be picked up by camel (we will discuss the file-component more in the next chapter) and it will be processed till the end of the route. Here we have multiple „processes“ which the message will go through, e.g. „unmarshall“ or even more essential „to“, which represents the „sending“ of the message to other systems (in this case to other file-directory named „outbox“), but this can be arbitrary switched to other systems e.g. Http-calls, JMS-Queues/Topics etc.). There is always one input endpoint and arbitrary many output endpoints, even 0.

Components
This was your first exposure to the file camel-component. As you have seen, i takes care of reading or creating new files for you, you only have to specify the path.
Let’s start with the basic of a camel-component. An camel-component will create an endpoint (typically referred via URI, e.g. „file:inbox“) to which other systems can send or receive messages. So this is an interface to the outer-world. If you want to receive messages you use keyword „from“, to send you use keyword „to“.
In our case, the file-component will help us create the file-endpoint via the URI, which we are specifying in the route.
The endpoint uri is typically composed of three parts:
<scheme>:<contextPath>?<options>

Example: „file:outbox?fileName=myOwnFileName“ - Scheme: Create a file-endpoint (camel will automatically look for file-component on classpath with the help of the internal ComponentResolver).
- Context path for File-Component is the directory (here we just use the directory outbox, which you have to always find out in the documentation for each component).
- Options are parameters, in this case we can use ?fileName which indicates that our component shall name our files „myOwnFileName„.
Camel already supports many other components (e.g. http, jms, …) .
So therefore you can use the already existing components to fulfill your needs. Just look for the correct dependency for your build.
You need an Http-call? Just add the HTTP-Component to your classpath and refer in your camel-Route via .to(„https:hostname:port“) and like explained before, camel will create for given parameters the corresponding endpoint (in this case producer endpoint, since we are sending messages, consumer endpoint if are receiving messages).
Marshalling and Validation
But let’s continue with our example route
We reading now files from the inbox-directory, which in our case are XML-Files. Typically we not only want to pass through the data, but also edit them. With camels-fluent API you can just use pre-existing methods like „unmarshall“ to help transform the data.

In this case, let camel with the library JACKSONXML do the transformation from XML-File to Java „Conzert“-POJO. Since now we want to do some additional editing (or validations), we use our own custom processor.
If you look at ConcertValidator , you see it implements Camels Processor, which is getting Exchange as an input (see picture 5).
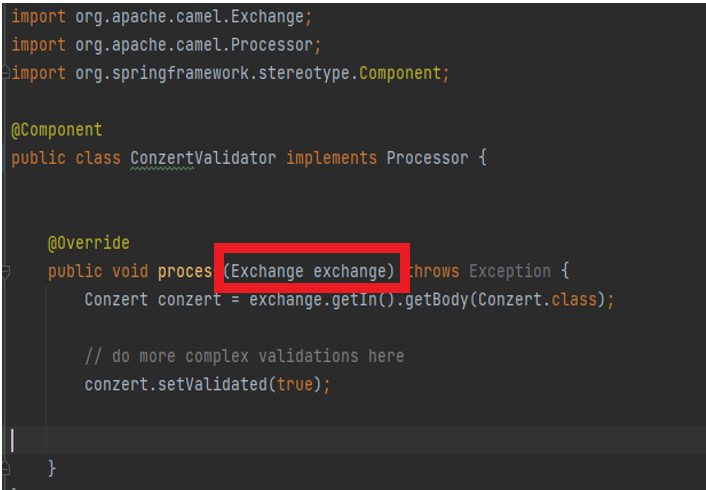
Exchange and Message
There we need to explain the last two remaining core-concepts in Camel. During the integration flow, Camel is saving it’s data (e.g. receiving an file) to it’s own general Entity org.apache.camel.Message, which contains „Body, key-value pairs of headers, identifier and a fault flag“). So in our case the file is now transformed to Camels-Message and in the body-field our XML-input will be found. The container for this message is the „Exchange“ with e.g. global variables (properties) and also saves if a Exception is thrown or defines the MessagePattern (InOnly or InOut).
You typically don’t have to do anything for this transformation, since the components should do the job for you (this makes camel attractive, since you dont have to do the before mentioned „low-level-plumbing“ like getting message in correct format to send to JMS Queue, or sending to FTP-Server. The components should do the job for you, you just need to configure the components correctly).
Remaining Route
The remaining route (see picture 6) just saves the value of „city“ in the properties-map of the exchange, transforms the data to JSON, logs the statement and send it to the file-component, which creates a new file with saved value of city as the filename. You should see it in the „outbox“ folder.
If you are interested in the how to get the city value from the object, camel uses the Simple Language (see here for more information).

Conclusion
This was a first introduction to camel. You should now know the core concepts like component, endpoint and understand the routing with messages and exchange. To extend this application, just add more components or other Enterprise Integration Patterns like Content Based Routing, Splitter and many more.

The example project is hidden in your internal gitlab
Fixed 🙂
Kind of, The word „Example“ links to Github now, while „Project“ still links to your gitlab.
Thank you very much. You are correct. I fixed it now 🙂
🐪🐪🐪👑