In the evolving landscape of containerized applications, ensuring their security has become a non-negligible task. SUSE NeuVector is an open-source, Kubernetes-native, Zero-Trust container security platform providing end-to-end vulnerability management for the full container lifecycle. It offers a lot of features like vulnerability scans, runtime security, network segmentation, compliance reports and much more. One additional feature is automated behavioral learning for creation of security policies. In this article we will delve into the usage of this feature and explore how you can leverage it as your starting point for security as code in a software development lifecycle.
By: Jan Bierboms
What is NeuVector?
NeuVector is a comprehensive container security platform that provides multi-layered protection for your containerized applications and the complete CI/CD pipeline. With its runtime security you can monitor and block not only known vulnerabilities but also unknown threats. NeuVector protects by following the Zero-Trust approach, where only predefined behavior is allowed and everything else blocked. This concerns not only the execution of various processes, as well as file access and network communication.
To secure your running applications NeuVector offers the capability to enforce customizable rules, which define precisely how your containerized applications interact with their environments. For example you can create simple rules which only allows java processes and restrict the execution of commands like curl or prohibit the access to files like /etc/shadow. NeuVector comes with a patented technology and Deep Packet Inspection allowing to react on the application traffic (layer 7). For example you can limit the network communication of a pod to use only a specific application protocol like RabbitMQ, PostgreSQL, DNS and so on.
NeuVector’s rules can be exported as custom resources in yaml format giving you the foundation for security as code. Using CRs has obviously many benefits like easy automation, consistency, auditability and versioning.
Behavioral Learning
To assist you in creating these security policies NeuVector comes with a feature called behavioral learning. NeuVector promises that DevOps teams can leverage this feature in a test environment to help creating security policies. NeuVector can automatically generate allow rules based on the observed behavior.
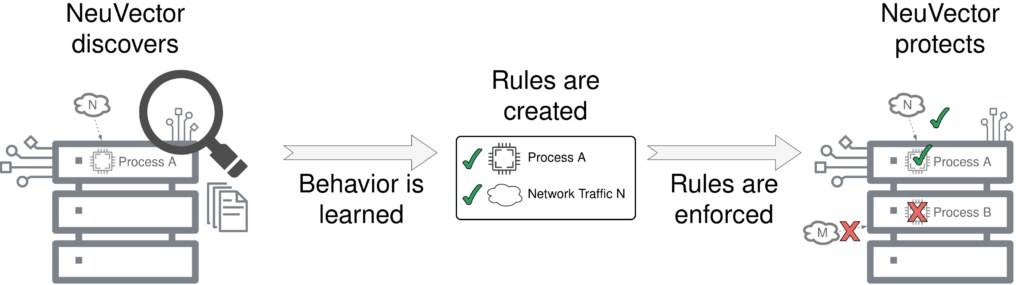
For example, if there’s a running java process it will create a corresponding allow-rule. If there is network traffic between two pods using the RabbitMQ protocol NeuVector will create a matching allow-rule. These rules can be exported and deployed to your PROD cluster. But since there are often minor differences between PROD and DEV or there are company wide security compliance these rules have to be modified. To understand how these rules can be adapted we first need to understand some concepts of NeuVector: Policy Modes and Groups.
Groups
A group is a collection of running containers that match a specific group selector. NeuVector will automatically create groups for your running application. These groups have a special naming convention nv.<deployment-name>.<namespace> and a special meaning: these groups are running in a policy mode. It is also possible to create custom groups. These groups can be as simple as ‚all containers running in one namespace‘ or ‚all containers using a specific image version‘ or even a group based on a DNS name or ip addresses.
Policy Modes
NeuVector comes with three policy modes that influence how rules are handled:
- Discover Mode: In this mode NeuVector actively learns the behavior of running applications concerning network access and running processes. NeuVector automatically generates allow rules based on the observed behavior.
- Monitor Mode: For groups running in Monitor Mode NeuVector will not create rules automatically. Instead security events are triggered providing information about the current violation. It is however possible to directly create rules from these security events.
- Protect Mode: As in Monitor Mode there is no active learning and any rule violation will be blocked and trigger a security event.
There are two details which also has to be mentioned. Only the groups created by NeuVector do have a policy mode, custom groups do not have a policy mode! Also the conflict resolution between services in different policy modes is one thing which has to be kept in mind, as described in NeuVector documentation.
Now that we have a common understanding of the most relevant parts, we can look at some examples in combination with NeuVector v5.2.0.
Rule creation and migration
Let’s say we are developing a simple microservice that communicates with a PostgreSQL database and we want to add a new feature. And also let’s assume that we have the three stages DEV, QA and PROD with following settings:
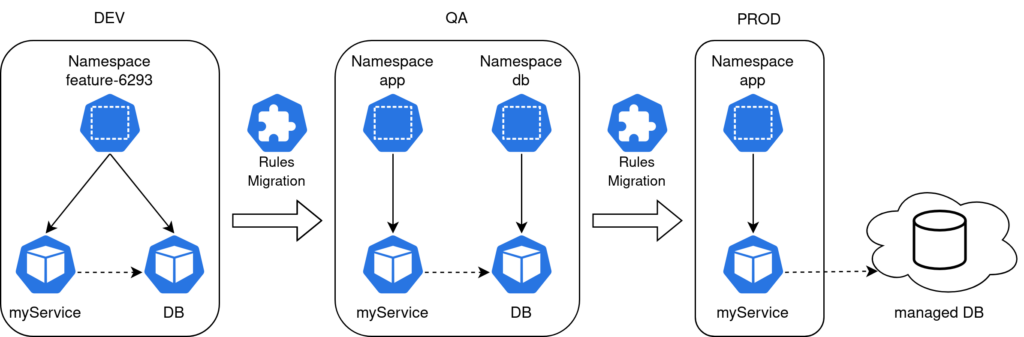
- In our DEV environment we have a namespace for each feature branch. And our microservice is running alongside with a small dedicated PostgreSQL DB.
- In the QA environment there is a shared database running in its own namespace. It’s filled with production like data and is used for acceptance tests. The microservice is running in its own designated app namespace.
- In PROD we will use a database managed by our cloud provider and the microservice is running in its own app namespace (same as in QA).
Lets start:
DEV → QA
First we create a feature branch. Since we are developing in an agile environment our CI/CD pipeline will automatically create a new namespace (feature-6293) and deploy our application alongside with a small PostgreSQL database instance to play with. Assuming our application/group is running in Discover Mode NeuVector will start with its behavioral learning and creates some rules for us:
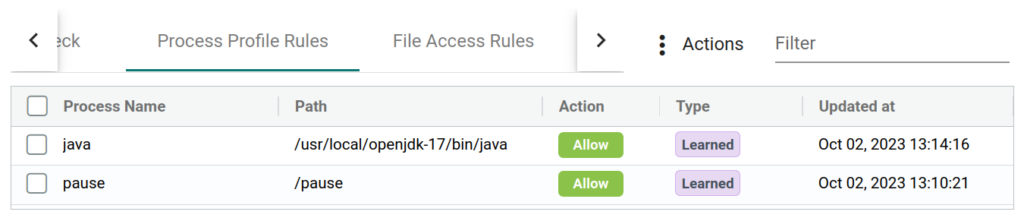
NeuVector will also inspect all network traffic and will correctly identify the connections between our microservice and the database. Therefore it created an allow-rule for the network traffic between our two pods. After we finished our new feature we want export the learned rules to use them in our QA environment. This is easily done by either using the GUI or calling the API. Here is an excerpt of the exported rules:
# [..]
egress:
  - action: allow
    applications:
    - PostgreSQL
    name: nv.postgres.feature-6293-egress-0
    ports: any
    selector:
      criteria:
      - key: domain
        op: =
        value: feature-6293
      - key: service
        op: =
        value: postgres.feature-6293
      name: nv.postgres.feature-6293
  # [...]
process:
  - action: allow
    name: java
    path: /usr/local/openjdk-17/bin/java
  - action: allow
    name: pause
    path: /pause
# [...]
We can see that NeuVector created two allow rules for the running processes java (main service container) and pause (pause container) and also an allow rule for some egress network communication. You can notice that the used protocol (PostgreSQL) is correctly identified, but the created rule will allow PostgreSQL traffic on every port (any). First thing we want to fine tune is to lock the port. For that we either have to create a new rule or modify our exported one. We also see that the namespace “feature-6293” is part of the selector and group name. If we want to use this rule in our QA environment we need some other adjustments as well:
#[...]
egress:
  - action: allow
    applications:
      - PostgreSQL
    # Rulename can be changed if wanted
    name: nv.postgres.feature-6293-egress-0
    # port locked
    ports: 5432  # <----- Changed here
    selector:
      # namespace changed
      criteria:
      - key: domain
        op: =
        value: qa-namespace  # <----- Changed here
      - key: service
        op: =
        value: postgres.qa-namespace # <----- Changed here
      name: nv.postgres.qa-namespace # <----- Changed here
#[…]
We changed the port from any to 5432 and also replaced the namespace “feature-6293” with “qa-namespace”. The rule name can be changed, but it is not required. The changes in the criteria are however necessary if we want to keep the selector/group or we need to rename our selector and therefore create a new custom group.
It is to be noted, that the creation and handling of CR(D)s in NeuVector comes with new challenges.
Specially the mixed usage of CR(D)s and rules created inside the NeuVector GUI can not be recommended, since groups which are managed with CR(D)s can not be changed inside the GUI. This even affects so called linked groups. A linked group is just the other participant in network communication. This means that if a network rule regulates the traffic between two services, both are treated as CR(D) managed afterwards. One option would be to not use the CR(D)s and instead import via GUI or API. Either way we want the QA environment to not run in Discover Mode, because otherwise we have no control over the rules and we might even get rules that are not editable.
After we deployed the new service with its modified rules and our acceptance tests were successful it is time to migrate them to PROD.
QA → PROD
As stated before there is a small but crucial difference between QA and PROD: our database is running outside of the cluster. An other modification of rules is therefore required. To control the network traffic to services running outside of the cluster we have to create a new custom group with the criteria type “address”. This group can be used to replace the endpoint in our network rule:
criteria:
  - key: address
    op: =
    value: url-to-my-external-db.com
After we have customized the rules and deployed them in PROD, we can now rely on the security features of NeuVector – preferably in protect mode.
Workflow and conclusion
Our small example showed that if there are difference between your stages, than there are probably some migration steps to perform when your are moving your rules. There are some other details to consider. For example, if you are running sidecars in your pods (service mesh), NeuVector will of course create whitelist rules for theses process. The problem however is that these rules affect to the complete group. If your service is running a java process and your sidecar is running python, then NeuVector’s autolearned rules would allow a java process inside your sidecar container and python in your main service. To bypass this problem you would need to split the rules manually into custom groups.
Workflow
In order to turn the whole thing we mentioned so far into a process that you can use in your agile continuous development you could use the following workflow:
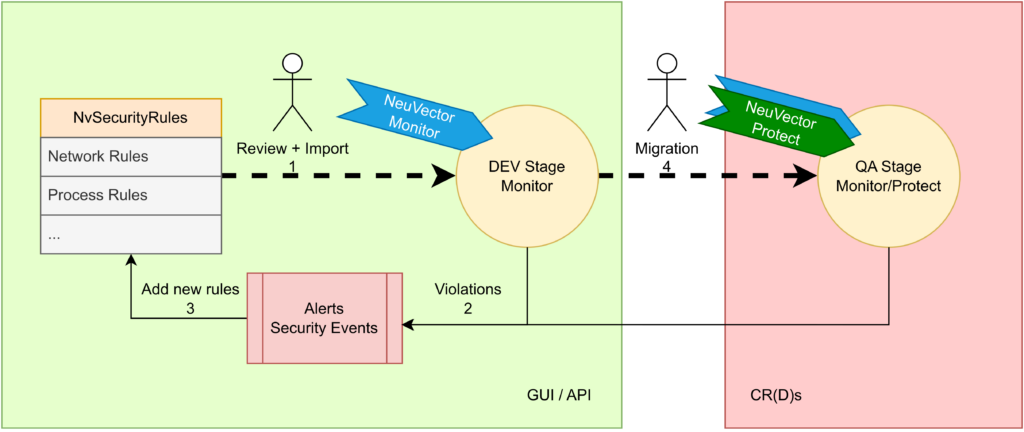
- Start with some security rules – possible generated by NeuVector in Discover Mode or even no rules at all.
- Deploy your application with your rules and let it run in Monitor Mode. From here you need to check for new security events
- Inspect the violations and create rules accordingly
- If you are satisfied and no more violation are triggered migrate the rules to your next environment and use the points mentioned here as a guide.
Conclusion
NeuVector’s behavioral learning is a useful way to get started with your rules. The created rules gives you a good head start on your NeuVector journey. Running in Monitor Mode and using the security events to create rules may be an alternative approach to create them. However, there is probably some manual tweaking required. But the possibility of exporting theses rules as CR(D)s empowers your DevOps teams to create robust security policies that can be your foundations for security as code.
Stay safe!